How to Smoke St. Louis Style Ribs That Stay Juicy Every Time | Brown Family BBQ
Learn how to smoke St. Louis style ribs that stay juicy and tender every time. Step-by-step tips from Brown Family BBQ using real wood, proper temps, and proven techniques.
ST LOUIS STYLE RIBSRUBS, SAUCES, & SEASONINGSPITMASTER TIPSSMOKING MEATBBQ RECIPESBROWN FAMILY BBQ STORIES
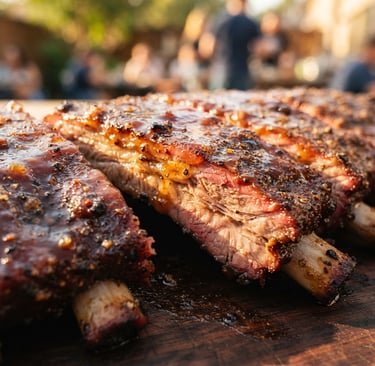
How I Smoke St. Louis Style Ribs That Stay Juicy Every Time
If there’s one thing people ask me more than anything else, it’s this:
“Mike, how do you get your ribs so tender without drying them out?”
The truth is, there isn’t some magic trick.
It’s a bunch of small things done the right way.
I’ve spent years cooking barbecue with my younger brother, Bubba, and my son Nick. Between family cookouts, cooking for other people, and now building Brown Family BBQ, we’ve cooked more racks of ribs than I could ever count. Along the way we’ve learned what works…and we’ve definitely learned what doesn’t.
We’ve made dry ribs.
We’ve overcooked them.
We’ve wrapped them too early.
We’ve wrapped them too late.
Every mistake taught us something.
Today, when someone eats one of our ribs and immediately reaches for another, it’s because we quit chasing shortcuts and started paying attention to the little details.
Here’s exactly how I do it.
Start With Good Ribs
I almost always buy St. Louis style ribs.
They have more consistent thickness, plenty of meat, and they cook more evenly than baby backs. They’re forgiving, which makes them great whether you’re just getting started or you’ve been smoking meat for years.
When I’m standing at the meat counter, I’m looking for racks with good marbling, even thickness from one end to the other, and plenty of meat covering the bones.
I don’t automatically buy the biggest rack.
Sometimes the prettiest rack cooks the best.
Remove the Membrane
This is one step I never skip.
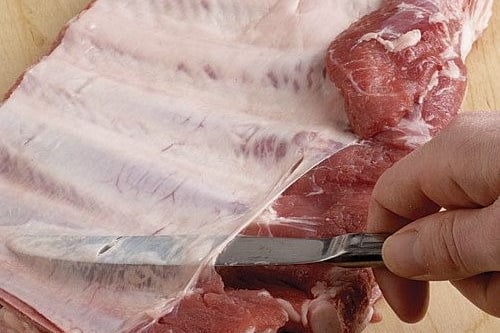
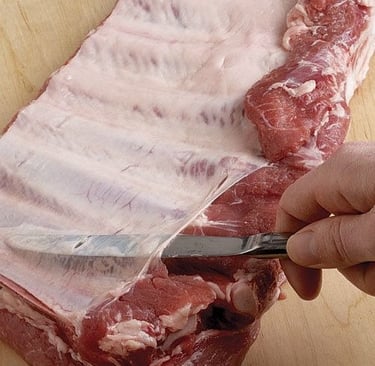
Flip the ribs over, slide a butter knife under the membrane on one end, grab it with a paper towel, and peel it off.
Removing it lets your seasoning penetrate the meat and gives you a much better bite.
Season Them Like You Mean It
At Brown Family BBQ, we’re big believers in letting the pork shine.
I use a generous coat of our rib rub and make sure every inch is covered.
Don’t be afraid to season heavier than you think.
A lot of it stays on the outside during the cook, and that’s what creates that flavorful bark everyone loves.
Once they’re seasoned, I let the ribs sit while the smoker comes up to temperature.
My Cooking Temperature
People argue all day about whether you should cook at 225 or 250.
Here’s where I stand.
I usually cook between 250° and 275°F.
I’ve found that temperature gives me excellent bark, renders the fat beautifully, and doesn’t require babysitting the smoker all day.
If you’re cooking with charcoal and wood like we do, that slightly hotter temperature also makes fire management easier.
Use Real Wood
We cook with charcoal and hardwood.
Hickory is our favorite because it gives ribs that classic barbecue flavor without overpowering the meat.
Sometimes I’ll mix in a little apple wood if I’m cooking for people who like a slightly sweeter smoke.
The biggest mistake I see beginners make is adding way too much wood.
Thin blue smoke is your friend.
Heavy white smoke can leave ribs tasting bitter.
Spritz…But Don’t Soak
Once the bark starts forming, I’ll lightly spritz the ribs every so often.
Not constantly.
Just enough to keep the surface from drying out.
Too much liquid cools the meat and slows down the cook.
You’re looking for balance.
To Wrap or Not to Wrap?
People ask this one all the time.
Honestly?
It depends.
If I’m cooking for a competition-style bite, I may wrap them for part of the cook.
If I’m cooking for friends and family, sometimes I don’t wrap them at all.
Both methods can produce incredible ribs.
The key isn’t wrapping.
The key is pulling them off the smoker at the right time.
Forget the Clock
One of the biggest mistakes new pitmasters make is cooking by time.
I don’t cook by the clock.
I cook by how the ribs look and feel.
When I pick up the rack and it bends nicely without falling apart…
When the meat starts pulling back from the bones…
When a toothpick slides into the meat with almost no resistance…
That’s when I know they’re getting close.
Those signs will tell you more than any timer ever will.
Rest Before Cutting
This might be the hardest part.
Once the ribs come off the smoker, leave them alone.
Give them 15 to 20 minutes to rest.
That lets the juices settle back into the meat instead of running all over your cutting board.
Trust me.
It’s worth the wait.
What We’ve Learned
One thing Bubba and I talk about all the time is that great barbecue isn’t about expensive smokers or fancy gadgets.
We’ve seen people spend thousands of dollars on equipment and still turn out average barbecue.
We’ve also seen folks cook incredible ribs on a basic charcoal grill.
The difference is paying attention.
Managing your fire.
Using good meat.
Not rushing.
Learning something every cook.
Nick has started picking up those same habits, and that’s one of the things I enjoy most. Barbecue has a way of bringing people together. Around here it’s never just about the food. It’s about standing around the smoker, giving each other a hard time, checking the fire, and making memories while the ribs cook.
That’s really what Brown Family BBQ is all about.
Final Thoughts
If you take one thing away from this article, let it be this:
Don’t chase perfect.
Cook more ribs.
Every rack teaches you something.
The best pitmasters I know—including us—didn’t learn from reading books. We learned by standing over a smoker, making mistakes, adjusting, and trying again the next weekend.
I still learn something almost every time I cook.
And honestly, that’s part of the fun.
If you give this method a try, I’d love to hear how your ribs turned out. That’s why I started Brown Family BBQ in the first place—to share what we’ve learned and help more people enjoy great barbecue with the people they care about.